
What’s that fuzz? Is it mold?
Learn More
What’s that fuzz? Is it mold?
the age-old question in the world of sprouting: root hairs or mold? Let’s break it down in a fun and easy way so you’ll never panic over your sprouts again.
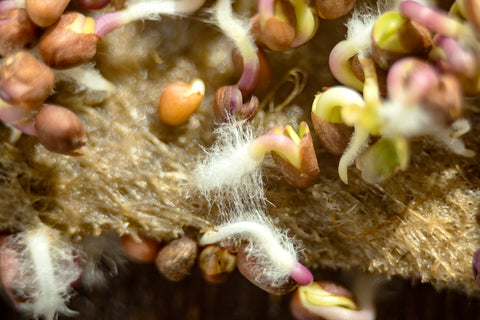
Root Hairs: The Fluffy Good Guys
Think of root hairs as your sprouts' fuzzy little socks! These tiny, white, hair-like
structures grow naturally along the roots to help the plant absorb water and
nutrients. They’re totally harmless and actually a sign of happy, healthy
sprouts.
How to Spot Them:
Root hairs look like a fine white fuzz.
They’re only around the roots, not on the stems or seeds.
When you rinse your sprouts, the fuzz disappears (because it’s just thirsty roots sucking up water!).
Fun Fact: Root hairs pop up when your sprouts feel a bit dry and are working hard to stay hydrated—kind of like a sprout survival instinct!
Mold: The Unwanted Party Crasher
Mold,
on the other hand, is the uninvited guest you don’t want hanging around your
sprouts. It’s a fungus that grows when there’s too much moisture and not enough
airflow.
How to Spot Mold:
It’s slimy or sticky,
not fluffy.
Mold tends to cover
the seeds in what looks like a blanket
Mold can be white,
gray, or even greenish.
It doesn’t rinse off
easily and might come with a funky smell.
The Quick Test: Rinse
and Check
Rinse your sprouts with cool water.
If the fuzz disappears, congratulations—it’s root hairs!
If it sticks around (and looks gross), sorry, it’s mold. Time to toss the batch and start fresh.
How to Keep Mold Away
Rinse and Drain Regularly:
For sprouts, rinse and drain 2–3 times a day with cool water to keep them
clean and hydrated. For microgreens, water the soil or growing mat just
enough to keep it moist—not soggy.
Avoid Standing Water:
Sprouts aren’t swimmers, and neither are microgreens! Ensure your
sprouting containers and microgreen trays are well-drained to prevent
water from pooling.
Promote Good Air
Circulation: Keep your sprouting jars tilted for airflow, and place
your microgreen trays in a well-ventilated area. A gentle fan can help
prevent stagnant air for both.
Give Them Space:
Overcrowded sprouts or microgreens are mold magnets. Spread your seeds
evenly and avoid planting them too close together.
Harvest on Time: Don’t
wait too long to harvest—older sprouts and microgreens are more prone to
mold. Sprouts are usually ready in 2–7 days, and microgreens in 7–14 days.
Clean Equipment:
Whether you’re growing sprouts or microgreens, always start with clean
jars, trays, and tools to minimize contamination risks.
So,
remember: root hairs are the sprouts’ adorable hydration helpers, while
mold is the yucky squatter you’ll want to kick out. Keep your sprouts happy,
and you’ll never have to deal with the latter! 🌱
Why are my sprouts slimy?
Learn More
Why are my sprouts slimy?
Slimy sprouts? Yikes! That’s usually a sign of too much moisture and poor air circulation—basically, your sprouts are drowning. But before you toss them, let’s figure out what went wrong!
Why Your Sprouts Are Slimy
- Overwatering – Sprouts need rinsing, but if they’re sitting in too much water, they turn into a soggy mess.
- Poor Drainage – If water isn’t draining properly, your sprouts stay wet, creating the perfect environment for bacteria.
- Lack of Airflow – If your sprouts are packed too tightly or stored in a humid space, they can’t breathe, and bacteria take over.
- Using the Wrong Seeds – Not all seeds are meant for sprouting! Mucilaginous seeds like chia, flax, and basil form a gel when wet, making them a slimy disaster in a jar. These need special dry sprouting methods instead.
- Old or Contaminated Seeds – Using low-quality, non-sprouting seeds increases the risk of spoilage. Always start with fresh, organic, sprouting-safe seeds.
- Too Warm & Humid – Warm environments speed up bacterial growth, turning your sprouts into a slippery situation.
How to Prevent Slimy Sprouts
✔️ Rinse Properly – Rinse your sprouts 2-3 times a day with cool, clean water to keep them fresh.
✔️ Drain Well – Always tilt your jar or use a well-ventilated tray to remove excess water.
✔️ Increase Airflow – Use a breathable lid or sprouting tray and avoid cramming too many seeds together.
✔️ Store in a Cool Spot – Keep your sprouts in a well-ventilated, room-temperature area (not in direct sunlight or a warm kitchen corner).
✔️ Use the Right Seeds – Stick to sprouting-safe seeds like alfalfa, broccoli, and mung beans—if you're using chia, flax, or basil, skip the jar and use a dry sprouting method instead.
✔️ Buy High-Quality Seeds – Only use organic, non-GMO sprouting seeds to reduce contamination risks.
If your sprouts are already slimy, sadly, they can’t be saved—toss them out, clean your sprouting equipment thoroughly, and try again with better drainage and airflow! 🌱
Can I reuse the hemp mats?
Learn More
Can I reuse the hemp mats?
The beauty of the hemp mats in both our microgreens and wheatgrass kits are that they make the kits self watering. It is a set and forget system.
We often get asked if it is possible to reuse them. Technically yes it is but with a lot of effort as you need to make sure the mat is squeeky clean. You do not want to risk any bacteria getting into your next crop so it is always best to start with a clean new mat.
If you would like to reuse them, then you would need to pull out all the roots of the previous crop, and then clean them with hydrogen peroxide and leave them in the sun to dry. And with all that, got to hope the mat does not degrade due to all the cleaning!
We are always on the look out for new mats but we have found nothing as effective as the hemp mats that make the system self watering.
How do I avoid mold or fungus?
Learn More
How do I avoid mold or fungus?
How to Avoid Mold or Fungus When Growing Sprouts and Microgreens?
1. Start with Clean Equipment
- Wash all jars, trays, and sprouting tools thoroughly with hot, soapy water before use.
- Sanitize equipment with a food-safe solution like vinegar or diluted bleach (1 tsp bleach per quart of water).
2. Choose High-Quality Seeds:
- Use organic, non-GMO seeds labeled for sprouting or microgreens.
- Ensure seeds are fresh and free from contaminants.
3. Rinse and Drain Regularly:
- Rinse sprouts 2–3 times daily with clean, cool water to keep them hydrated and fresh.
- Drain thoroughly after each rinse to avoid water pooling, which encourages mold growth.
4. Ensure Good Air Circulation:
- Place sprouting jars or trays in a well-ventilated area.
- Use a sprouting jar with a mesh lid or a tray with good airflow.
- Avoid overcrowding seeds, as it reduces airflow and promotes mold.
5. Control Humidity and Moisture:
- Avoid excessive moisture. Sprouts should be moist but not soaking wet.
- For microgreens, water the soil or growing mat lightly without creating soggy conditions.
6. Monitor Temperature:
- Keep your sprouting area between 60°F and 75°F (15°C–24°C). Higher temperatures can encourage mold.
- Avoid placing sprouting containers in direct sunlight, which can create a hot, humid environment.
7. Prevent Stagnation:
- Don’t leave water sitting in your sprouting container.
- For microgreens, ensure the growing medium has proper drainage.
8. Use Natural Mold Inhibitors:
- Add a few drops of food-grade hydrogen peroxide to rinse water.
- For microgreens, sprinkle a small amount of cinnamon on the soil surface—it’s a natural antifungal agent.
9. Harvest on Time:
- Harvest sprouts when they’re ready (usually within 2–7 days, depending on the seed type). Overgrown sprouts are more prone to mold.
- For microgreens, harvest as soon as the first true leaves appear (7–14 days).
10. Inspect Regularly:
- Check your sprouts or microgreens daily for signs of mold or unusual odors.
- Discard any batch showing mold to prevent cross-contamination.
- Use clean equipment.
- Ensure good airflow.
- Don’t overcrowd your seeds.
My seeds didn’t sprout. What gives?
Learn More
My seeds didn’t sprout. What gives?
1. Improper Storage of Seeds
- Exposure to Moisture: Seeds exposed to humidity during storage may rot or lose their ability to germinate.
- Extreme Temperatures: Seeds stored in hot or freezing conditions can lose viability.
- Pest Damage: Seeds affected by pests during storage may not sprout properly.
3. Incorrect Soaking
- Soaking Too Long: Seeds can drown if soaked for too long, leading to rot.
- Inadequate Soaking: If seeds aren’t soaked long enough, they may not absorb enough water to activate germination.
- Wrong Water Temperature: Water that’s too hot or too cold can damage the seeds.
4. Insufficient Rinsing and Draining
- Not Rinsing Enough: Seeds need to be rinsed 2–3 times daily to stay moist and prevent mold or bacteria.
- Excess Water: Seeds left sitting in water after rinsing can rot instead of sprouting.
- Too Little Water: Seeds can dry out if they’re not rinsed adequately, stopping the germination process.
5. Poor Air Circulation
- Stagnant Air: Lack of airflow can create conditions for mold and bacteria, which inhibit sprouting.
- Overcrowding Seeds: Seeds packed too tightly prevent proper air circulation and even sprouting.
6. Unsuitable Temperature
- Too Cold: Germination slows or stops below 60°F (15°C).
- Too Hot: Seeds can dry out or rot in temperatures above 80°F (27°C).
7. Lack of Light for Microgreens
- While sprouts don’t need light to grow, microgreens do. Without adequate indirect sunlight or grow lights, microgreens won’t grow properly.
8. Contaminated Seeds or Equipment
- Dirty Equipment: Unclean jars, trays, or sprouting equipment can harbor bacteria or mold, killing seeds.
- Contaminated Seeds: Seeds contaminated with pathogens like E. coli or Salmonella may not sprout or could pose health risks.
9. Overwatering or Underwatering Microgreens
- Overwatering: Soil or hydroponic mats that are too wet can cause seeds to rot.
- Underwatering: Seeds and growing media that dry out will halt germination.
10. Wrong Type of Seeds
- Seeds Not Meant for Sprouting: Some seeds are not suitable for sprouting due to hard coatings or low germination rates.
- Specialized Seeds Needed for Microgreens: Not all seeds are ideal for growing into robust microgreens; some may require different conditions.
How to Fix These Issues
- Use fresh, high-quality, organic seeds labeled for sprouting or microgreens.
- Store seeds in a cool, dry, and dark place.
- Follow proper soaking times for each seed type.
- Rinse and drain seeds thoroughly 2–3 times a day.
- Ensure good airflow by avoiding overcrowding and using ventilated sprouting setups.
- Maintain optimal temperatures for germination (60–75°F).
- Clean all equipment thoroughly before use.
Provide adequate light for microgreens after germination.
By addressing these factors, you can significantly increase your success rate in sprouting seeds and growing lush, healthy microgreens.
Say Goodbye to Pesky Fruit Flies with This Clever Hack!
Learn More
Say Goodbye to Pesky Fruit Flies with This Clever Hack!
Fruit flies—the uninvited guests who seem to show up every time your kitchen gets a little too lively. While they might not harm anything, they’re definitely annoying. After years of ignoring them (and reluctantly coexisting), we stumbled upon a genius solution, courtesy of a witty old gardener from across the pond in England.
The Secret Weapon Against Fruit Flies
Picture this: an English pub in Lewisham, London, and a gardener sharing his best-kept secret for tackling fruit flies over a pint. Here’s his sage advice, in all its glory:
"Get yourself a jar, pour a bit of vinegar in the bottom, and roll up a piece of paper into a funnel. Pop the funnel into the jar with the narrow end down. Them flies will swarm right in, but they’ll never find their way back out. Problem solved!"
We couldn’t resist trying it, and it works like magic! Vinegar is irresistible to fruit flies, and the funnel trap ensures they can’t escape.
Upgrade the Trap
If vinegar isn’t your thing, don’t worry—fruit flies aren’t picky. We’ve had success using wine or kombucha as bait. In fact, kombucha has become our go-to (mostly because we always have some brewing). Here’s how to set it up:
- Find a jar or cup.
- Add about an inch of vinegar, wine, or kombucha to the bottom.
- Roll a piece of paper into a cone and place it in the jar, with the narrow end just above the liquid.
- Set the trap near your fruit or sprouting area.
Before you know it, the fruit flies will be flocking to their new favorite hangout—one they can’t leave.
Why This Works
Fruit flies are drawn to the smell of fermentation, which is why they love sprouting areas, ripe fruit, and anything tangy. The funnel is the ultimate trick: they can fly in, but escaping? Not a chance.
Next time these pesky insects show up uninvited, arm yourself with this simple yet brilliant trap. Whether you use vinegar, wine, or kombucha, you’ll be one step ahead in the battle against fruit flies—and you might just enjoy outsmarting them in the process. Cheers to a fly-free kitchen!
Why Do My Broccoli Sprouts or Microgreens Smell So Bad?
Learn More
Why Do My Broccoli Sprouts or Microgreens Smell So Bad?
A little sulfur smell is normal for broccoli sprouts and microgreens—it’s the sulforaphane, a powerful antioxidant, at work. But if the odor is overpowering, it’s likely due to too much water and poor drainage.
How to Fix It
- Rinse and Drain Thoroughly: Always shake out excess water after rinsing. Both sprouts and microgreens hate sitting in puddles.
- Improve Airflow: Use a tilted jar or a well-ventilated sprouting tray for sprouts. For microgreens, avoid overwatering and ensure proper drainage from the growing medium.
- Upgrade Your Setup: Not all tools work well for broccoli. Choose a sprouter or tray with excellent drainage to keep your greens happy and odor-free.
Why Do Sprouts Need Rinsing But Microgreens Don’t?
Learn More
Why Do Sprouts Need Rinsing But Microgreens Don’t?
If you’re growing both sprouts and microgreens, you might wonder why sprouts need rinsing 2–3 times a day, but microgreens don’t need rinsing at all. The difference comes down to how they grow and how they stay hydrated.
🌿 Sprouts: High Moisture, No Airflow = Frequent Rinsing Needed
- Sprouts grow in water (inside a jar or sprouting tray) without soil, meaning they stay constantly moist.
- This lack of airflow can lead to bacteria, mold, or spoilage if not properly rinsed.
- Rinsing 2–3 times daily keeps them hydrated, fresh, and oxygenated, preventing them from becoming slimy or unsafe to eat.
🌱 Microgreens: Soil + Airflow = No Rinsing Needed
- Microgreens grow in soil or a hydroponic mat with good air circulation, allowing excess moisture to evaporate naturally.
- They drink water through their roots, so they don’t sit in moisture like sprouts.
- Because of this, they don’t need rinsing—just regular watering from below!
💡 Key Takeaway
Sprouts need frequent rinsing to stay clean and oxygenated in their moist, enclosed environment. Microgreens grow in open air with root-based hydration, so they stay fresh without extra rinsing.
Happy growing! 🌱💚