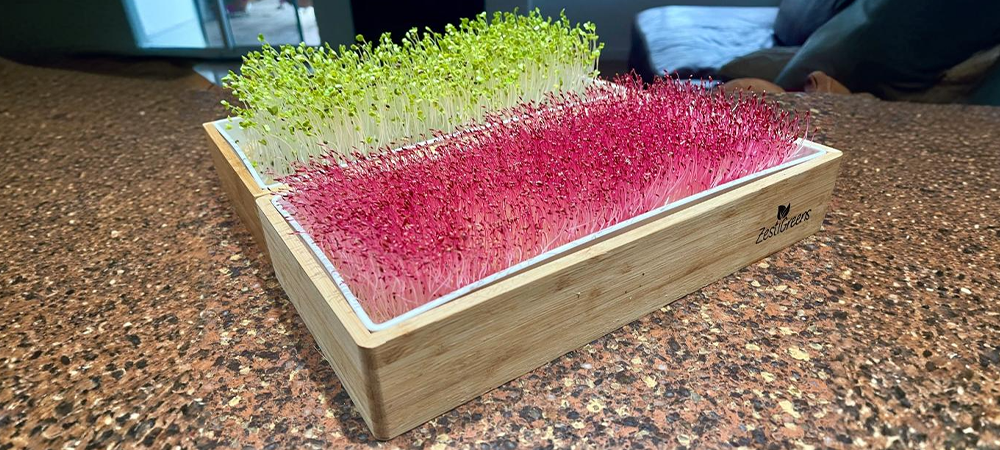
How to Grow Microgreens
Microgreens are a bit like sprouts that decided to grow up. They need light, soil (or a hydroponic mat), and a few more days than sprouts to grow their cute baby leaves (cotyledons).
Below are the instructions for the 2 microgreens kits that we sell and below that (scroll down), you will find microgreens instructions more generally including which seeds need which type of medium.
Microgreens Growing Kit Instructions
Say goodbye to the guesswork—our self-watering microgreens kit keeps your greens happy and hydrated, so you can enjoy fresh, homegrown nutrition with zero fuss!

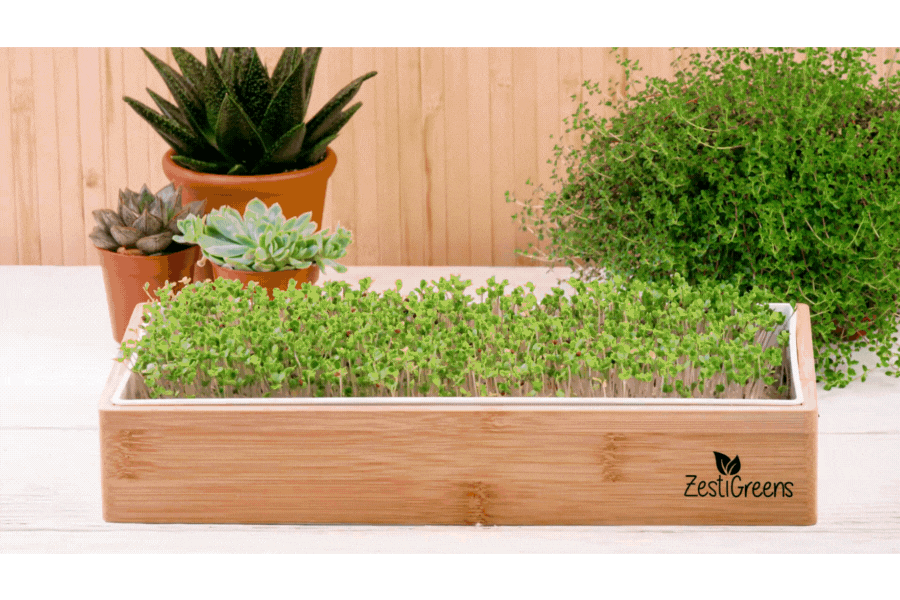
Soil Based Microgreens Kit Instructions
Get your hands a little dirty and your greens a lot fresher—our soil-based microgreens kit gives your sprouts the rich, natural start they crave for big flavor and even bigger nutrition!
INSTRUCTIONS FOR GROWING MICROGREENS GENERALLY
Choose your Microgreens Seeds Wisely: Read this first!
Learn More
Choose your Microgreens Seeds Wisely: Read this first!
There is a fantastic choice of microgreens that you can grow very easily. Here is a list of those that prefer soil and those that you can grow hydroponically.
PREFERRED GROWING
MEDIUM FOR MOST COMMON MICROGREEN SEEDS
| Microgreens Seeds | Soil | Hydroponic |
|---|---|---|
| Amaranth- Red Garnet | S | H |
| Anise | S | |
| Arugula | S | H |
| Basic Salad Mix | S | H |
| Basil | H | |
| Bean (Fava) | S | |
| Borage | S | H |
| Broccoli | S | H |
| Brussels Sprouts | S | H |
| Buckwheat | S | H |
| Cabbage | S | H |
| Carrot | S | |
| Cauliflower | S | |
| Celery | H | |
| Chervil | H | |
| Chia | H | |
| Chinese Mahogany | H | |
| Chives | S | H |
| Chrysanthemum | S | H |
| Cilantro | S | |
| Clover | S | H |
| Collards | S | H |
| Corn | S | |
| Cress | S | H |
| Dill | S | H |
| Endive | S | H |
| Fennel | S | |
| Fenugreek | S | H |
| Kale | S | H |
| Kohlrabi | S | H |
| Leek | S | H |
| Lemon Balm | S | |
| Lettuce | S | H |
| Mustard | S | H |
| Nasturtium – Empress of India | S | H |
| Nasturtium – Jewel Mix, Whirlybird | S | |
| Orach | S | |
| Oregano | S | H |
| Parsley | S | H |
| Pea | S | |
| Radish | S | H |
| Rutabaga | S | H |
| Shiso (Perilla) | S | H |
| Sorrel | S | |
| Sunflower | S | |
| Swiss Chard | S | |
| Turnip | S | H |
What medium do I grow Microgreens in?
Learn More
What medium do I grow Microgreens in?
There are several growing mediums you can use for growing microgreens, each with its own benefits and challenges. Here’s a breakdown:
Each type of microgreen thrives in different conditions, so choosing the right growing medium can maximize growth, flavor, and yield. Here’s a guide based on the microgreen variety you want to grow:
🌱 SOIL-BASED GROWING MEDIUMS
Best for: Most microgreens will grow in soil and especially large-seeded varieties like sunflower & peas grow best in this medium.
1️⃣ Potting Soil / Organic Compost – Provides nutrients naturally, holds moisture well, and supports strong root growth.
2️⃣ Coconut Coir – A sustainable alternative to soil; excellent water retention and aeration but lacks nutrients.
3️⃣ Peat Moss – Lightweight and great for moisture retention, though not the most sustainable option.
4️⃣ Vermiculite & Perlite Mix – Improves drainage and aeration when mixed with other mediums.
🌿 SOILLESS / HYDROPONIC GROWING MEDIUMS
Best for: Small-seeded microgreens like broccoli, radish & arugula
1️⃣ Hemp Mats – Biodegradable, holds water well, and great for clean, soil-free growth.
2️⃣Coconut Coir Mats – Similar to hemp mats but do not hold water as well as hemp mats.
3️⃣ Bamboo Fiber Mats – Durable, biodegradable, and clean for indoor use.
4️⃣ Jute Mats – A natural, breathable fiber mat, though prone to mold if overwatered and we found it has a strange odor also reported in reviews of this product.
5️⃣ Biostrate Felt Mats – Made from natural fiber, designed for hydroponic microgreens.
🌍 UNCONVENTIONAL / EXPERIMENTAL MEDIUMS
Best for: Small-scale, experimental growing
1️⃣ Paper Towels / Coffee Filters – Good for germination but not ideal for long-term growth.
Be sure that your paper towels do not contain any harmful colors or dyes. It is best to choose food grade paper.
2️⃣ Burlap Fabric – Breathable and reusable but dries out quickly.
3️⃣ Sand – Can be used but drains too quickly, requiring frequent watering.
4️⃣ Left over Coffee grinds - ha ha yes what a great use for these. This will work but we found microgreens grow better if you mix the coffee grinds in with soil.
What can I grow Microgreens in?
Learn More
What can I grow Microgreens in?
You can grow microgreens in a variety of containers and growing setups, depending on your space, budget, and preference. Here’s a list of the best things to grow microgreens in:
🌱 1. Traditional Growing Trays (Best for All Microgreens)
✅ Standard 10"x20" Trays – Most common, perfect for commercial & home growing if you have the space.
✅ Shallow Seedling Trays – Ideal for soil or hydroponic methods.
✅ Mesh Bottom Trays – Great for hydroponic growing (allows drainage & airflow).
💡 Tip: Use trays with drainage holes to prevent waterlogging.
🍽️ 2. Household Containers & DIY Options (Budget-Friendly & Small Spaces)
✅ Takeout Containers – Plastic clamshells with lids create a mini greenhouse but you will need to make sure you do not overwater.
✅ Baking Trays & Cake Pans – Wide surface area for even microgreen growth but you will need to make sure you do not overwater.
✅ Egg Cartons – Great for small-scale experiments (but dry out quickly).
✅ Mason Jars – Good for sprouting, but not ideal for microgreens.
💡 Tip: Poke small drainage holes in DIY containers for better airflow.
🌍 3. Biodegradable & Eco-Friendly Containers
✅ Coconut Coir Pots – Natural & compostable.
✅ Biodegradable Paper Cups – Good for small batches.
✅ Wooden Crates or Boxes – Add a rustic touch & allow for airflow.
💡 Tip: These options retain moisture well but may need extra drainage.
💧 5. Hydroponic Systems (No Soil Needed!)
✅ Hemp Mats – Sustainable, moisture-retentive, and clean. These are our favorite after many years of trying literally everything!
✅ Coconut Coir Mats – Great for eco-conscious growers.
✅ Biostrate Felt Mats – Designed for hydroponic microgreens.
💡 Tip: Hydroponic mats work best for small-seeded microgreens like broccoli, radish, and arugula.
Prepare Your Growing Tray
Learn More
Prepare Your Growing Tray
- If using soil: Fill your tray with about 1 inch of organic potting mix and gently tamp it down.
- If using a hydroponic mat like a hemp mat: Lay it flat in the tray and moisten it evenly. Our microgreens kit provides a ledge for the hemp mat to lie on so it is raised above the water with the mat ends touching the water. This enables the mat to wick up the water, making it self watering. Way easier!
Plant Your Seeds
Learn More
Plant Your Seeds
To Soak or not to Soak?
Should You Soak Microgreens Seeds? 🌱💧
It depends on the type of seed! Some microgreens benefit from soaking, while others do not need it and may even be harmed by it.
✅ Soak These Seeds (6-12 Hours)
Why? Soaking helps soften their hard shells, speeds up germination, and improves even growth.
🌿 Large & Hard-Shelled Seeds:
- Pea Shoots
- Sunflower
- Cilantro (Coriander) – optional but recommended
- Nasturtium
- Buckwheat
- Beets & Chard – soaking can help, but not essential
💡 How to Soak:
- Place seeds in a bowl with room-temperature water
- Let them soak for 6-12 hours (overnight is great!)
- Drain and rinse before planting
❌ Do NOT Soak These Seeds
Why? These seeds are small, mucilaginous (gel-forming), OR already quick germinators. Soaking them causes clumping or rot instead of helping.
🌱 Tiny, Quick-Growing Seeds:
- Broccoli, Kale, Cabbage, Kohlrabi
- Radish & Mustard
- Arugula & Cress
- Basil & Chia (Mucilaginous—form a gel when wet!)
💡 Instead of soaking, just sprinkle them evenly on your growing medium and mist them lightly.
🚀 The Bottom Line: Soak or Not?
- If it’s a large, hard seed → YES, soak it!
- If it’s small or forms gel when wet → NO soaking!
Once soaked or not soaked, (ha ha read above!) sprinkle seeds evenly across the surface. No need to bury them. Try as best you can to sprinkle them evenly and avoid too much clumping of seeds as that makes it more tricky for the seeds to germinate at the same time and also makes them more at risk of mold.
Seeds germinate best in the dark so if using soil then sprinkle some tablespoons of soil lightly over the top of the seeds - no need to press down. If using another medium then simply cover with some kind of black out lid. Yes you can even cover them with a box of cereal :)
💦 How Often Should You Water Microgreens?
Learn More
💦 How Often Should You Water Microgreens?
The watering frequency depends on the growing medium, humidity, and airflow. Here’s a general guide:
1️⃣ Before Germination (Days 1-3)
✅ Misting only – Keep the surface moist but not soaked
✅ Cover with a humidity dome or another tray to lock in moisture
✅ DO NOT overwater – Seeds should be damp, not swimming!
2️⃣ After Germination (Days 4-10+)
✅ Bottom watering is best – Prevents mold & keeps leaves dry
✅ How often?
- Soil-based growing → Water once a day or when soil feels dry
- Hydroponic (mats) → Check daily; water when the mat feels light & dry
✅ If top-watering, use a spray bottle or gentle watering can
💡 Tip: If leaves look droopy or yellow, they may need more water. If there’s mold or a sour smell, reduce watering & improve airflow.
Best Temperature for Growing Microgreens
Learn More
Best Temperature for Growing Microgreens
Microgreens grow best in a temperature-controlled environment. Here are the optimal temperature ranges:
🌿 Best Temperature: 65-75°F (18-24°C)
🔥 Too Hot (80°F+) – Faster growth but weaker stems, possible mold
❄️ Too Cold (Below 60°F) – Slows germination and growth
🌀 Other Factors for Healthy Microgreens
✅ Humidity: 40-60% (Higher humidity = risk of mold)
✅ Airflow: Use a small fan to prevent mold & strengthen stems
✅ Light: 10-12 hours/day with indirect sunlight or LED grow lights
🚀 Quick Watering & Temperature Guide
Growing StageWateringTemp (°F)Germination (1-3 Days)Mist only65-75°FGrowth (4-10+ Days)Water daily (bottom watering preferred)65-75°FHot ConditionsMore frequent wateringAvoid 80°F+Cold ConditionsLess water, slower growthKeep above 60°F
💡 Best results? Keep microgreens in a cool, well-ventilated area with steady moisture. 🌱💦
Harvest in Style
Learn More
Harvest in Style
When & How to Harvest Microgreens 🌱✂️
Microgreens are ready 7-14 days after planting, once they have 2-3 inches of growth and their first true leaves appear. Rule of thumb? If they look lush and vibrant—snip away!
✂️ How to Harvest:
Use sharp scissors and cut just above the soil or growing mat. Harvest dry to avoid spoilage.
How to Store Microgreens for Freshness 🥗❄️
✅ Depending on the container you have used you can just snip off your microgreens as you need them. Having them right there on the kitchen counter reminds you they are there ready to be eaten!
If however you want to cut them (maybe you can get going, growing the next batch, hint hint), then
✅ Store in an airtight container with a paper towel to absorb moisture. You can use ziplock bags too.
✅ Refrigerate at 35-40°F (1-4°C)—they’ll stay fresh for 5-7 days.
Enjoy them fresh in salads, sandwiches, or smoothies! 🌱✨
Troubleshooting?
Refer to the section called GROWING FAQ for troubleshooting.